Friday 31 July 2009
I know I shouldn't but ......
I just had to say Woo Hooo and a huge thank you to our fabulous Design team and if you are wondering what I am talking about just follow the link here, and if you can not wait Letraset have taken some of our tutorials (with permission of course) and will be putting them on there website, the first of them are already there,
Sorry for interupting the flow but I could not resist :)
Hugs Gina and Denise xxx
Sorry for interupting the flow but I could not resist :)
Hugs Gina and Denise xxx
Weekend workshop #9
Hello again, wow thank you so much for the cards for this weeks challenge of “Pastel Pink & Cool Aqua + Maria’s sketch” they are all so beautiful, and everyone’s colouring is improving by the week. We also have newcomers to PM’s too, it is great to see everyone still so excited about the markers, and if you think you have missed anything, fear not, we have all the prior tutorials on PDF files just pop me an email here and I will get them to you asap. If you have already sent me an email and not had a response please email again as the PDF tutorials have been so popular and I must admit I have been overwhelmed with emails :)
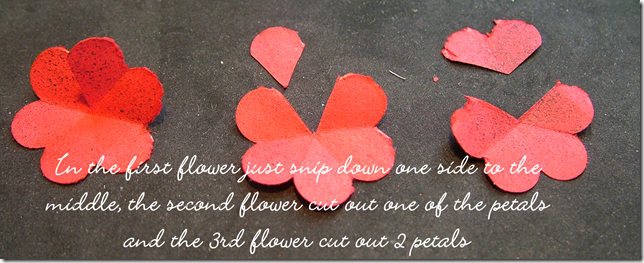
Ok this week we only have one tutorial but it is an amazing one. If you have seen Michele’s cards you will have noticed her beautiful flowers, well she did not buy them like that, she made them and even better she is going to show us all how to do it :)
************
Michele’s Flower Tutorial
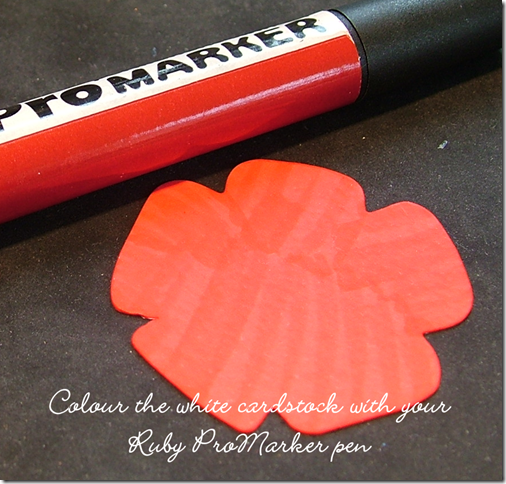
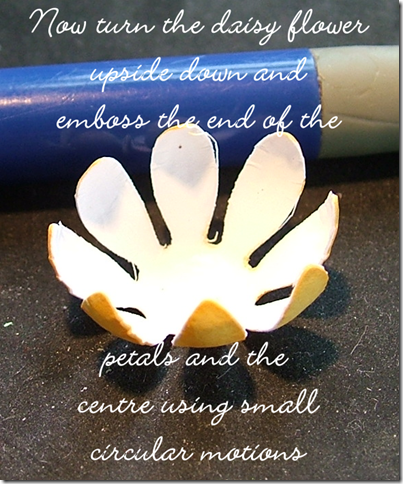
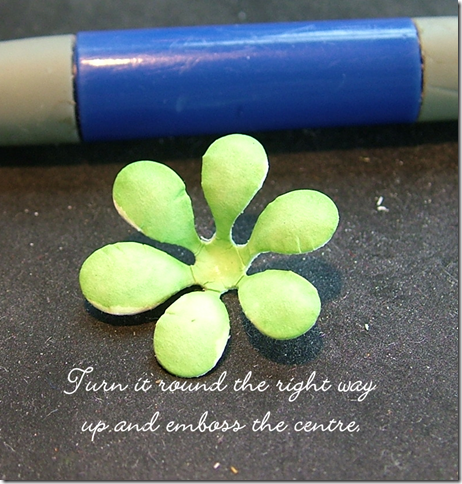
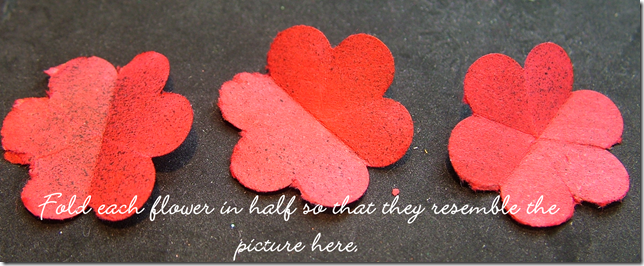
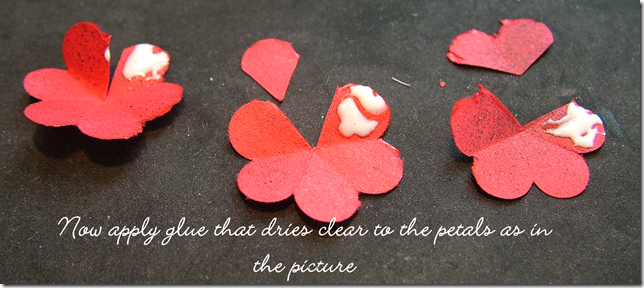
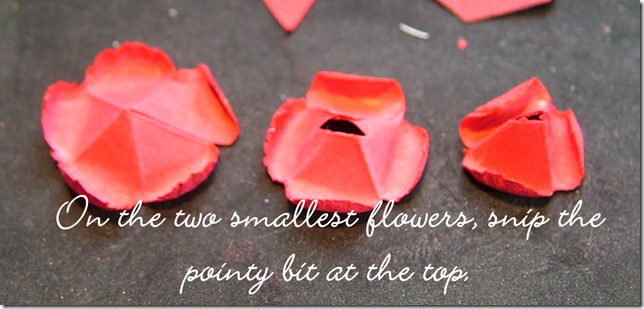
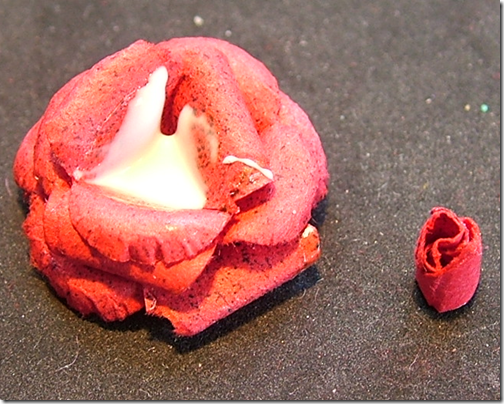
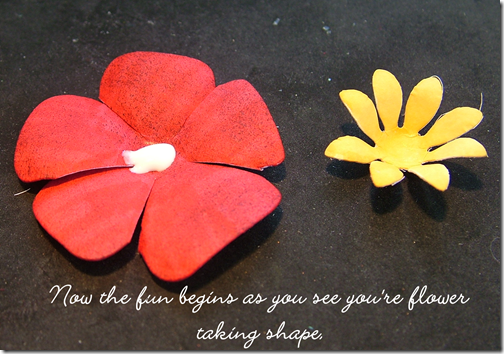
I have had lots of requests to show how I make my flowers, so here’s how I do it. For the roses I first got the idea off this blog, and this is my version.
These are the die cuts and flower punch that I use most of the time when I make these flowers.
You will also need white scrap cardstock and plain white photocopier paper for the roses.

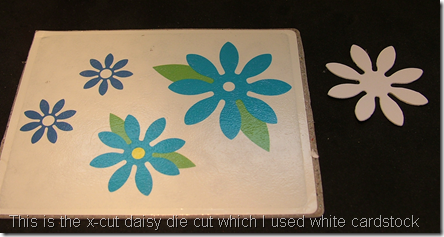

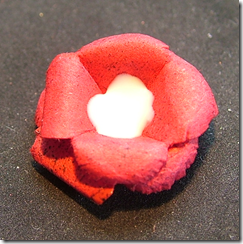
And here's the final result. Hope you enjoyed this tutorial and watch this space, as I've a few more up my sleeve.
************
Well that is it for this week, if you have any questions or ideas which you would like the DT to put into tutorials for you, just email us, we are always happy to hear from you all.
By the way we were a little late announcing the Top 5 Passionista from Week 9, so check out the previous post to see if you are one of the lucky 5!
Hugs Gina, Denise and the DT xxx
Thursday 30 July 2009
Week 9 - Top 5 Passionista
Oops we got a little sidetracked and completely forgot about revealing last week's Top 5 Passionista. Sorry to keep you waiting longer than normal, but here they are as chosen by Ida:-
Torill (screppa) - http://screppa.blogspot.com/2009/07/passion-for-promarkers-9.html
Barbara (Paper Dreams) - http://babseslick.blogspot.com/2009/07/passion-for-promarkers-8-stamp-with-fun.html
Angie (Angie's cards) - http://angiefellows.blogspot.com/2009/07/pro-marker-challenge-this-is-my-card.html#comments
Norma (From my Craft Room) - http://frommycraftroom.blogspot.com/2009/07/happy-birthday.html
Emma (Crafty Emma) - http://craftyemma.blogspot.com/2009/07/5-challenges-in-one.html
You can now all take the Top 5 Passionista blinkie and add it to your blog, should you wish to.

Hugs, Gina & Denise x
Torill (screppa) - http://screppa.blogspot.com/2009/07/passion-for-promarkers-9.html
Barbara (Paper Dreams) - http://babseslick.blogspot.com/2009/07/passion-for-promarkers-8-stamp-with-fun.html
Angie (Angie's cards) - http://angiefellows.blogspot.com/2009/07/pro-marker-challenge-this-is-my-card.html#comments
Norma (From my Craft Room) - http://frommycraftroom.blogspot.com/2009/07/happy-birthday.html
Emma (Crafty Emma) - http://craftyemma.blogspot.com/2009/07/5-challenges-in-one.html
You can now all take the Top 5 Passionista blinkie and add it to your blog, should you wish to.
Hugs, Gina & Denise x
Tuesday 28 July 2009
Week 10 - Pastel Pink & Cool Aqua plus sketch
Welcome to week 10 here at PFP. We had some wonderful entries to last week's challenge of Lime Green and Rose Pink and we really enjoyed visiting all your blogs. Please check the sidebar later to find out who was the lucky winner of the gorgeous goodies from Papirloftet. Congratulations also to our top five passionista as chosen by Ida, they will be revealed later on tonight.
Onto this week's challenge - the colour combo of Pastel Pink & Cool Aqua was chosen this week by Maria and she has also given you a sketch that you must use.


We are glad you are all enjoying the tutorials on the Weekend Workshop and are using the hints and tips on your entries - it's fab to see! Don't forget to check back on Friday for the latest workshop where we will be showing you a fabulous flower tutorial by Michele. If you have any questions or tutorials that you would like to see on the Weekend Workshop please drop us an email or leave a comment and we will do our best to sort it out for you.
We're looking forward to seeing all your wonderful creations this week.
Hugs, Gina & Denise x x
Onto this week's challenge - the colour combo of Pastel Pink & Cool Aqua was chosen this week by Maria and she has also given you a sketch that you must use.
Our sponsor this week is Daisy May Designs and one lucky person will winner 5 sheets of downloads from their online shop.
Our Design Team have been working hard this week and really enjoyed using Maria's sketch. Here are their cards:Maria
Michele
Natalie
Sarah
Sue
Caryn
Debbi
Denise
Gina
Helen
Ida
We are glad you are all enjoying the tutorials on the Weekend Workshop and are using the hints and tips on your entries - it's fab to see! Don't forget to check back on Friday for the latest workshop where we will be showing you a fabulous flower tutorial by Michele. If you have any questions or tutorials that you would like to see on the Weekend Workshop please drop us an email or leave a comment and we will do our best to sort it out for you.
We're looking forward to seeing all your wonderful creations this week.
Hugs, Gina & Denise x x
Friday 24 July 2009
Weekend workshop #8
Hello again, wow thank you so much for the cards for this weeks challenge of “Rose Pink & Lime” they are all so beautiful, and everyone’s colouring is improving by the week, don't forget this weeks challenge runs till Tuesday morning. We also have some newcomers to PM’s too, it is great to see everyone, and if you think you have missed anything, fear not, we have all the prior Weekend workshops on PDF files so just pop me an email here and I will get them to you asap :)
You need to print it onto the paper/card you would normally use with your pm's to get a true representation.

 I have started with seven basic white ribbons 1. organza 2. gross grain 3. satin 4. cheap acrylic lace 5. paper printed 6. ric-rac 7. raffia Place your ribbon onto a piece of plain white paper securing it each end with some type of repositional glue, so that it doesn't move about to much while you are colouring When colouring your ribbons you need to use smooth even strokes all going the same way, try not to go over the same area twice unless you want the colour to be darker. You will see from the results below I have coloured the blue one slightly darker at each end so you can see the effect. I have chosen three colours, blossom,coca and pearl blue so you can see how well the pens take to all the different types of ribbons.
  The only ribbon which is slightly wasteful on the pen ink is the organza as you will be left with quite a bit of ink on the paper all the other ribbons absorb most if not all of the ink and you get lovely matching ribbons.
  Thanks Sue :o)


If you have any questions or have any ideas which you would like the DT to turn into tutorials please let us know, we really do love to hear from you :)
Hugs Gina, Denise and the DT xxx
************
This week we have got the design team to show us what else they use PM’s for, but first Debbi has done a great colour chart, it will help you see which PM’s you are still in need of and once coloured in, you will be able to see which colour matches, so if you would like a copy, Debbi has put it onto PDF file for you, just email me (I will automatically email it to those who have weekly PDF tuts emailed to them) You need to print it onto the paper/card you would normally use with your pm's to get a true representation.

************
Now onto what else you can do with ProMarkers :)
Sue I have started with seven basic white ribbons 1. organza 2. gross grain 3. satin 4. cheap acrylic lace 5. paper printed 6. ric-rac 7. raffia Place your ribbon onto a piece of plain white paper securing it each end with some type of repositional glue, so that it doesn't move about to much while you are colouring When colouring your ribbons you need to use smooth even strokes all going the same way, try not to go over the same area twice unless you want the colour to be darker. You will see from the results below I have coloured the blue one slightly darker at each end so you can see the effect. I have chosen three colours, blossom,coca and pearl blue so you can see how well the pens take to all the different types of ribbons.
  The only ribbon which is slightly wasteful on the pen ink is the organza as you will be left with quite a bit of ink on the paper all the other ribbons absorb most if not all of the ink and you get lovely matching ribbons.
  Thanks Sue :o)
 ************
Colouring Gems
Here is another great use for our favourite pens. I have used some clear papermania adhesive stones and simply coloured them with my promarkers. 
I have chosen three different colours to show the effect. Yellow, Poppy and Amethyst.
They dry very quickly and as you can see the colour looks great, they will now match your cards perfectly.
************
coming up NEXT WEEK – we have a fabulous flower Tutorial from MicheleIf you have any questions or have any ideas which you would like the DT to turn into tutorials please let us know, we really do love to hear from you :)
Hugs Gina, Denise and the DT xxx
Subscribe to:
Posts (Atom)


