


This week we are lucky enough to have an exclusive drawing by Ruth, which Michele has done a tutorial for, Ruth is a very talented artist who is in the process of getting her images made into stamps, please go visit her blog she has many many more cards that show off her talent.

Michele’s Tutorial
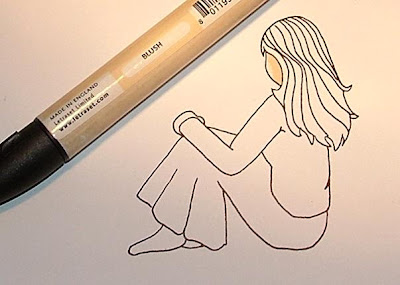
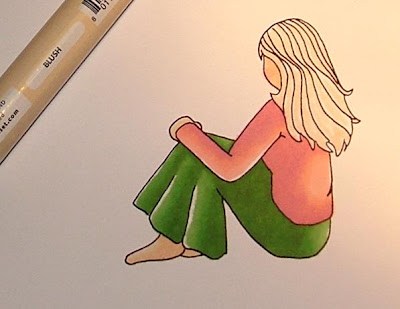
 Firstly print out the supplied image that has been drawn by the very talented Ruth. I've printed my image out on my laser printer and I've used concord record card. To make sure that it doesn't bleed too much, I glue two cards together and that usually stops the bleed.
 The colours that I use for skin tones is Ivory, blush and pastel pink.
I start by adding the lightest colour first, while trying to imagine where the light source is coming from.
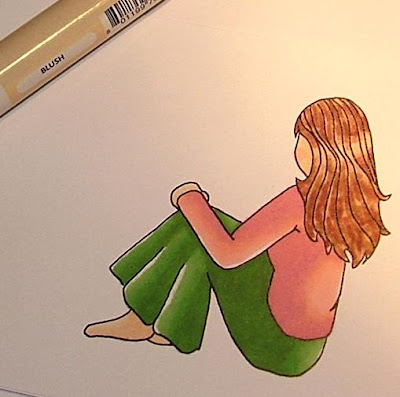
 I then use the next shade which is Blush and not going quite as far as the Ivory.
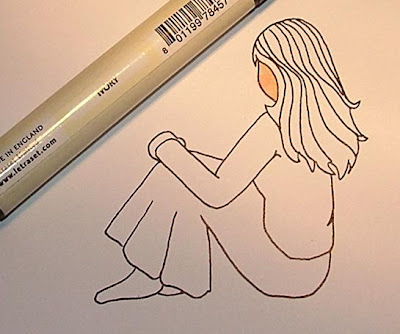 go over the whole face with your lightest colour again in a small circular motion, this blends all the colours together.

Just do all the other skin parts the same way, try and visualize where the light source is coming from. Start with the lightest of your colour choice and work your way through to the darkest of your colour choice.

Here is the skin complete and the start of the top. Again start off by using the lightest of the colours that you have chosen.
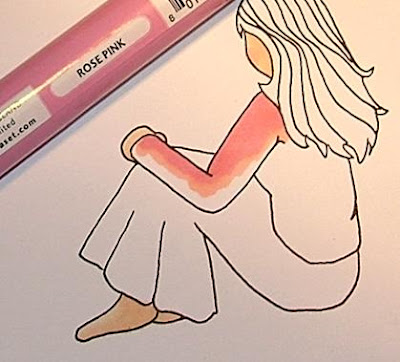 add your next shade not going as far as the first
 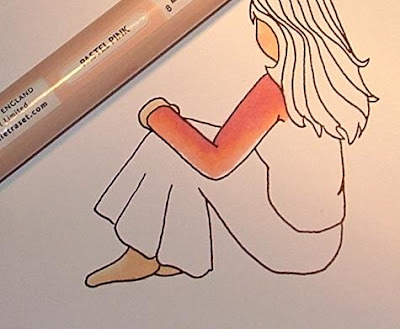 Now go over the whole area again with the lightest shade. You will see in the picture that I've not coloured the whole top, you will find out why at the end :)

 Now colour in the rest of the top in the same way as before.


For the skirt the same technique applies again. Imagine where the light source is coming from and then use the lightest shade, then the next shade and then the darkest shade. The go over the whole area again with the lightest shade, leaving a white gap where the highlights would be.
 Now for the hair the same applies but instead of colouring the areas in full I just use strokes, as I want to leave gaps.


 Now go over the whole of the hair in small circular motions using the lightest shade
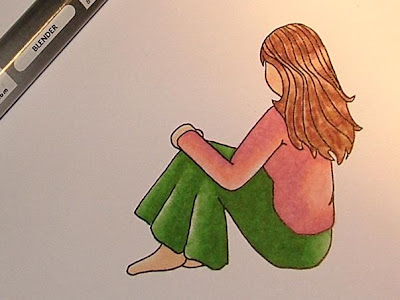 Now get your blender pen and go over the top and skirt in small circular motions. This not only blends in the white gaps but also gives a lovely textured look.
Phew that's it, I hope you enjoyed this tutorial and has been helpful.
Hugs Michele x
Now for this weeks workshop Ruth has given you the image “Sitting Girl” to try out this tutorial yourself, how fabulous is that. If you struggle with blending or shadows here is a great opportunity to have a go with the step by step guide from Michele. You don’t have to use the same colours as Michele, you can use any colours you like. The DT have also done cards with the “Sitting Girl” image and they will be uploaded here on Saturday at midnight, we will also be uploading yours too all Sunday and Monday, so please add them in the comments box :)
Here is the image, please let everyone know where you got your image from, Ruth has been very kind in giving us one of her images and it is only fair she gets the credit, also if you use the image in the future as this image is copyrighted to Ruth
")
Now you print the image any size you want and then we want to see what you can do, just copy the image and print :), if you do have any problems just give us an email and we will do our best to help.
Other News
Now if you are on Facebook there is a great group that has been set up by Sharon “I ♥ Promarkers.” A group for all of you who ♥ Letraset Promarkers. Sharon is also looking for a couple of DT members to join her. So if you are on Facebook and want to join in all the fun, just click on the image below or pop over to Sharon’s blog. Don't worry this challenge blog is not going anywhere just thought it would be a nice place for all PM lovers to meet up :)

- A tutorial on Jeans/Trousers from Debbi
- We are going to answer Alice’s question “Could you tell us what are the perfect combos to create shadows?”
And finally, Debbi is having some yummy candy to celebrate her 10,000 hits, so pop over, you have to be in it to win it :)
Hugs Gina, Denise and the Design Team xxx


5 comments:
Hi, it's great to see what you have done with my drawing! This is a super tutorial and I'll be having a go when I get home from work.Bein touch, Ruth x
I have uploaded my card to my blog.You can find it here. Ruth x
Great tutorial and such a gorgeous drawing :) Thank you Ruth for sharing this with us :)
Hugs Ida
Great tutorial, thanks to Ruth for a gorgeous image to use. I look forward to seeing everyones cards.
Natalie x
WOW, thank you so much Ruth for letting us use this image and I wanted to share with you what I created:
www.mystampinggrounds.blogspot.com
Hugs,
catherine
Post a Comment