


BLENDER TUTORIAL
Before I start I just want to say that if the paper you use makes the promarkers bleed, then using the blender pen is probably not a good idea as the technique I'll be showing you, you have to wet the paper quite a bit.
First off you have to chose your image. The paper that I use unfortunately I do not know the name of it yet but I've been in contact with the art shop who provided it. So watch this space.
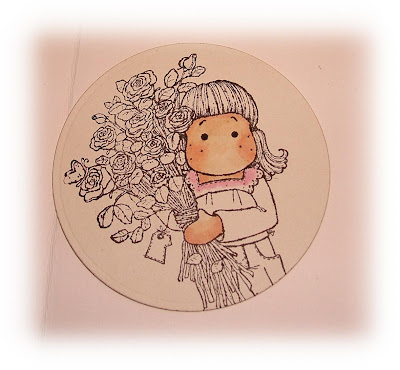
I start by adding the lightest colour first, in this instance is Rose Pink, while trying to imagine where the light source is coming from.

I then colour with Maroon, which is a darker shade and not going quite as far as the first colour. I forgot to take a picture of the next stage but basically you take your blender pen and go over the whole area again using small circular motions until it's all blended in.

Just do all the other parts of the top the same way, try and visualize where the light source is coming from.

When you use the blender you only have to use two colours then go over the area with the blender pen.
Here are a few more ideas from the DT:
Maria - I like my blender pen! I use it for fuzzing out hard edges, also on delicate places like wings where I colour around the inside edges with a pale colour, then blend out the hard edge, it leaves a delicate layer of colour. You can also use it to make lovely pollka dots on a piece of clothing. Colour as normal, then touch with the tip of the blender randomly onto the coloured area. I've also managed to achieve a batik look the same way. Oh, and of course it's good for when you accidentally go over the line with your colouring!
Helen - I've been having a play with the blender pen and have found that if you cover the area you are colouring with blender pen before you add the colours, the blender helps keep the inks wetter for longer so they will mix easier than if you colour first then blend on top. though it does make the colours a little lighter and if you put blender pen too near the edges of the image it can encourage the colour to bleed off the image.
Helen - I've been having a play with the blender pen and have found that if you cover the area you are colouring with blender pen before you add the colours, the blender helps keep the inks wetter for longer so they will mix easier than if you colour first then blend on top. though it does make the colours a little lighter and if you put blender pen too near the edges of the image it can encourage the colour to bleed off the image.
we are all on a learning curve with the blender pen, so we will be coming back to it in coming weeks, but hope this encourages you all to have a go at using your blender pen a bit more and don't forget if you have any idea's yourself please let us know :)
**********
Now we have Debbi's how to's on colouring "Hair and Skin"
COLOURING WITH PROMARKERS #1 - Hair (brunette)
For this "how to.." I have used the Sitting Gorguss Girl image from Sugar Nellie.
Firstly I choose about 4 or 5 promarkers from the same colour family, for brown hair I usually use Sandstone, Cinnamon, Cocoa, Burnt Umber and Umber.

I start off with the palest colour, in this case its sandstone, and roughly colour any areas I want highlighted. It helps to imagine where the light source is coming from.

Then I take the next darkest colour (cinnamon) and colour with inward strokes around the pale areas, if the promarker has dried you may need to blend the 2 colours - I do this with the palest colour, taking the strokes from the darker colour towards the paler colour.


I then repeat this for each gradually darker colour, keeping the darkest colour for areas that are in shadow - for instance the hair behind the character's neck and the very tips.


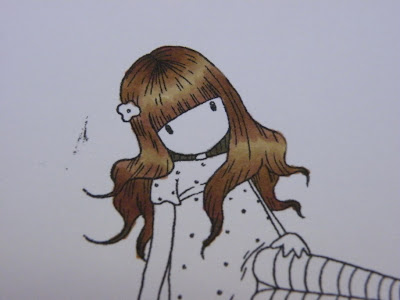
Once the ink has dried on the page, I take either a sakura white gelly roll pen or an inkssential white pen and draw on some highlights on the lightest areas.


So this is what the finished article will look like

this technique works for almost any colour of hair, I have used it for brunette, black (using 5 shades of warm grey promarkers), blue, pink, green, auburn etc
**********
COLOURING WITH PROMARKERS #2 - Skin (caucasian)Ok, firstly here are the 2 colours of promarkers I use...

I colour the skin area with Ivory using a circular motion


Then I add Blush by dotting colour to areas that I think would be in shadow e.g. just below the fringe/hairline, the neck and the top of the arm just below the sleeve as well as areas that would naturally have a bit more colour, for instance cheeks (elbows and knees are other places but not in this particular image)


I then go back over the whole area with Ivory, again in a circular motion in order to blend the colours.

And this is the image so far with the skin and hair done...

We will be finishing this gorguss girl off next week but if like me you can not wait you can pop over to Debbi's blog and find the rest of the tutorials on her sidebar :)
**********
Q&A's
Ann - I was wondering which are the best colors to use for teddy bears eg the Forever Friends bears? Do you have any suggestions please?
Answer from Maria - I quite often colour my Elzybells teddies in similar colours to the Forever Friends bears, and I usually use Vanilla as a base, Sandstone or Raw Sienna for shadows, blend with more Vanilla. Add a touch of Blush on the cheeks. Hope this helps.
**********
NEXT WEEK on Weekend workshop -
How to's on dress/top and tights/socks
How to store and storage
Q&A’s
How to store and storage
Q&A’s
Please feel free to contact us with any questions or ideas for this section of the blog, we all love to hear from you and don't forget that this weeks challenge is "Cinnamon and Pumpkin" and will be open until Tuesday 9am
We are so glad that you are all excited and look forward to these weekend workshops - see you again next week!
Hugs Gina, Denise and the Design team xxx


8 comments:
Thanks so much for all this info...it's a great read and can't wait to put it into practise
Fantastic tutorials thank you so much for taking the time to do them
Huggles
Michelle
xxx
Thanks for putting all this effort in for everyone - it's really interesting stuff.
Ann xxx
Thanks for the tutorial as I have not done any of you challenges yet. Only becuase I was not sure how to use the promarkers and this helps, I have ordered some more markers so I can play along.
Hugs
Suzette
Great tips girls and I am loving the challenges so far!!
Emma xxx
Brilliant tutorial, thanks for the information, it's going to help alot of us so much. Can't wait for next weeks.
Loveing the challenges too.
xx
A great tutorial which I will be referring to again ,no doubt. I hope it helps my colouring! Ruth x
Fantastic tutorial!!! Thanks for sharing your fabulous knowledge with us!
♥ ♥ ♥
Michaela
Post a Comment